**Click to Play or Pause the Video**
### **Creating a New Account** Choose the desired account type from the options available on the left side of the screen, including Mailgun, Amazon SES, or Sendgrid. After selecting your preferred service, click the "Create Account" button to initiate the account creation process. Subsequently, click the highlighted section to access and expand the details of the newly created account, revealing the fields that require completion. Retrieve the essential credentials from your chosen platform, and then conclude the setup by clicking the "Save Account Details" button.**Click to Play or Pause the Video**
### **Obtaining API Credentials from Mailgun** To acquire the "MailGun Domain" value, log in to your MailGun account, and from the list of domains, select the one you intend to use. Copy the corresponding domain address and paste it into the designated "MailGun Domain" field within your Voila Email Settings. For obtaining the "MailGun API Key" and "MailGun API Base URL" values, you have two options: you can either click on the desired domain, as indicated in the highlighted area, to navigate directly to the API key generation page or navigate through the left-hand bar by clicking the "Sending" tab and then proceed to the "Overview" page. Locate and select the API section on this page, providing you with the required credentials. Subsequently, paste these acquired values into their respective fields: "MailGun API Key" and "MailGun API Base URL" within your Voila Email Settings.If you are using a Sandbox, make sure that the recipients are authorized in the [Mailgun dashboard](https://app.mailgun.com/app/dashboard).
[](https://documentation.despatchcloud.com/uploads/images/webp/Shipping/Shipping_ES_06-08.webp) ### **Obtaining API Credentials from SendGrid** 1. Log in to your SendGrid account and access the "Settings" section. You can do this by clicking on "Settings" in the dashboard or using this direct link: [SendGrid Settings](https://app.sendgrid.com/settings/api_keys). 2. On the "API Keys" page, locate and click the "Create API Key" button, which is positioned in the top right corner. 3. Follow the provided instructions to generate an API key. Be aware that the generated API key will be visible only once for security reasons, so copy and paste it into the "API Key" field within your Voila configuration. 4. Ensure you have a trusted sender by navigating to the "Settings" section again and selecting "Sender Authentication." Alternatively, use this link: [Sender Authentication in SendGrid](https://app.sendgrid.com/settings/sender_auth). 5. On the "Sender Authentication" page, you have two options: - Authenticate a domain, allowing you to send emails from any address under a domain you control. - Verify a single sender, enabling you to send emails exclusively from a specific address. 6. After completing the sender authentication, copy the approved email address and paste it into the "Test Sender" field within your Voila settings. 7. Before saving your settings, click the "Test Settings" button to verify your configuration functions correctly. 8. In the "Name" field within Voila, you can enter any label that helps you identify this as your SendGrid account. This field is for your reference. [](https://documentation.despatchcloud.com/uploads/images/webp/Shipping/Shipping_NES_SendGrip.webp) ### **Obtaining API Credentials from Amazon SES** To set up Amazon SES as your email provider, you must obtain the Test Sender, Region, Key, and Secret details. Follow these steps to complete the setup: 1. Log into your AWS account and ensure the selected region aligns with your intended usage. You can do this by expanding the region menu located in the top right corner of the AWS console. 2. Next, create an IAM (Identity and Access Management) user with the "AmazonSESFullAccess" policy. You can initiate this process by visiting the [IAM User Creation](https://console.aws.amazon.com/iam/home) link. 3. Follow the steps outlined in the provided GIF or instructions on the page. After successfully creating the IAM user, click the "Download .csv" option and securely store the downloaded CSV file on your computer. This CSV file contains your Key and Secret credentials. [](https://documentation.despatchcloud.com/uploads/images/webp/Shipping/Shipping_NES_AmazonSES_1.webp) As the second step in setting up Amazon SES as your email provider, please follow these instructions: 1. Go to the Amazon SES Dashboard page to initiate the "Create Identity" process, which authorises a sender email or domain. 2. On the SES Dashboard, you have two identity options: verify an entire domain or a specific sender email address. After providing all the necessary information, click the "Create Identity" button at the bottom right corner of the page. 3. After completing this step, you must validate the email address or domain. To do this, you must request production access from the SES Dashboard. To do this, click "Account dashboard" on the left-hand menu to navigate this page. You'll find the "Request production access" button at the top of this page. Click it to finalise the process. 4. While on your dashboard, you can identify your AWS region in the dropdown menu. Interact with the button at the top right corner; the selected region will be highlighted in orange. For example, it might appear as "eu-west-2." You'll use this region information in your Voila configuration's "Region" section. 5. In the last section, you'll find an example of how to input your information into Voila. The "Name" field can be any label you prefer. Use the email address you used during the Amazon SES setup as the "Test Sender." Follow the region instructions mentioned above in the "Region" section. Retrieve the "Key" and "Secret" from the CSV file. Once you've completed all these steps, you can test and save the connection. [](https://documentation.despatchcloud.com/uploads/images/webp/Shipping/Shipping_NES_AmazonSES_2.webp) # Email Templates ## **Overview** We take immense pride in a standout feature – the Email Template Creation capability. This feature empowers you to craft a limitless array of personalised and pre-designed templates, which are invaluable for sending notifications to your customers regarding their shipments via Voila . This document is your comprehensive guide to the suite of tools for crafting bespoke email templates. In essence, we'll walk you through creating an email template and demonstrate how to incorporate text, images, GIFs, HTML code, and more into your templates. ### **Accessing the Email Templates Page** To access the Email Templates page, click the "Notification" button in the left-hand menu and then choose the "Email Templates" tab from the top-right corner of the page.**Click to Play or Pause the Video**
### **Creating a Template** To initiate the creation of a new template, click on the "Create Template" button in the top-right corner of the page. This action will lead you to a fresh, blank template page. Your initial step should be naming your template, which can be done through the page's top-left corner.**Click to Play or Pause the Video**
### **Variables & Usage** You'll access a JSON-structured list of variables by clicking the "Variables & Usage" button, conveniently located next to the naming field. This functionality enables you to incorporate shipment data seamlessly into your template content by inserting these variables. For practical guidance on utilising variables and implementing loops, refer to the provided examples in the "Usage" tab. - **Example Variable:** - `Your Tracking Code with {$courier} is {$trackingCode}. It will arrive at {$shipment->ship_to->postcode}.` - **Example Loop:** - `{foreach $items as $item} You ordered {$item->quantity} of {$item->description}{/foreach}` It's important to note that we employ Smarty 3 as the template engine for this process. For a more in-depth understanding, you can find further details in the [Smarty 3 Documentation](https://www.smarty.net/docs/en/).**Click to Play or Pause the Video**
### **Email Editor** Observing the multitude of tools and elements available on the right-hand side of the page, it becomes evident that these resources are instrumental in simplifying crafting your email content. Let's delve into how to harness these tools to construct your preferred template. You have two options for utilising these elements: 1. **Drag & Drop:** You can drag and drop one of the elements from the "Content" section into the blue box. 2. **Select & Add:** Alternatively, click the blue box and choose the desired element from the available options.**Click to Play or Pause the Video**
### **Content** The "Content" section comprises two categories: "Basic" and "Pre-made" blocks, each offering various elements for crafting your email templates. **Basic:** - **Text:** This element adds a text box to your template, enabling text input and editing via the tools displayed atop the text box and within the right-hand "Content" section. - **Image:** You can incorporate images into your email template using this element. After adding it, customise the image box by uploading it from your computer or selecting a free stock image from Pexels. Options include creating folders, selecting and deleting images in the file manager, and additional settings in the "Content" section. - **GIF:** This element allows you to add GIFs to your email template. You can change the default GIF by clicking on the image box and choosing from options like GIPHY or providing a custom source URL. - **Button:** Use this element to add clickable buttons linked to URLs. Button text, link, shape, and colour options are available in the "Content" section. - **Divider:** Add dividers to separate content within your template. Customise line style, colour, and background colour by clicking on the divider element. - **Spacer:** This element inserts space between other template elements. You can adjust the spacer height and background colour. - **Social:** This element incorporates social media icons into your email template. You can customise icon styles, sizes, and padding and even upload custom icons. The "Is Share URL" option streamlines social media sharing by pre-populating messages and images. - **Video:** Add videos from YouTube or Vimeo by entering the respective links. - **HTML:** Embed HTML code into your email template using this element. Access the HTML Content section for code input. **Pre-made:** - **Header:** Drag and drop the "Headline" to insert a headline, allowing HTML code input for customising the header. - **Content:** This option provides predefined Title, Paragraph, Buttons, and Divider elements for easy inclusion in your template. - **Footer:** By dragging and dropping "Company Footer," you can add a predefined footer to your template. Additionally, there are "Structure" and "Setting" sections. The "Structure" option lets you choose from predefined design structures, such as one, two, three, or four elements in a row, simplifying the placement of your desired elements. In the "Setting" section, you can access a list of settings applicable to the entire template, not just specific elements, streamlining global adjustments to your template's appearance and behaviour.**Click to Play or Pause the Video**
### **Options** Located on the top bar, you'll find essential buttons to enhance your template design experience: - **Redo & Undo:** These buttons empower you to redo or undo your actions, ensuring precise control over your template's evolution. - **Preview:** By clicking this button, you can visualise your template in a rendered state, precisely as it would appear to your customers. - **Save:** The save button is crucial on the far right side of the bar. Your template changes remain unsecured until you click this button. Once saved, you can revisit your templates anytime to view your creation. - **Options:** Once you're back at the templates page, clicking the options button reveals a menu offering choices like copying, editing, and deleting your template. Copying simplifies template creation by allowing you to retain the parts you need for your new template, saving you valuable time and effort.**Click to Play or Pause the Video**
### **An Example Email Template** We've designed a basic email template example that can provide you with valuable insights. Below, we'll break down the elements used and their order to simplify replicating or creating a similar email template with a comparable structure. **1. Header with Company Logo:** - We've incorporated a picture field at the top, where you can insert your company's logo and adjust its size. **2. Divider:** - We've added a divider below the company logo to create a visual separation between sections. **3. Personalised Message Text Field:** - In the next section, you'll find a text field. It is where you can include a meaningful message using available variables. These variables fetch data for each order, enabling you to craft personalised emails for each customer. **4. Divider:** - Another divider follows the personalised message section, maintaining visual clarity. **5. Social Media Links and Additional Text Field:** - The subsequent section combines both text and social media fields. Here, we've customised the social media links for our company. You can easily modify this field to include as many platforms as possible. Furthermore, if you wish to include a platform unavailable in the presets, you can upload a custom logo and tailor it to your needs. With just a few straightforward steps, our user-friendly graphical interface empowers you to create visually appealing and personalised emails that resonate with your customers. [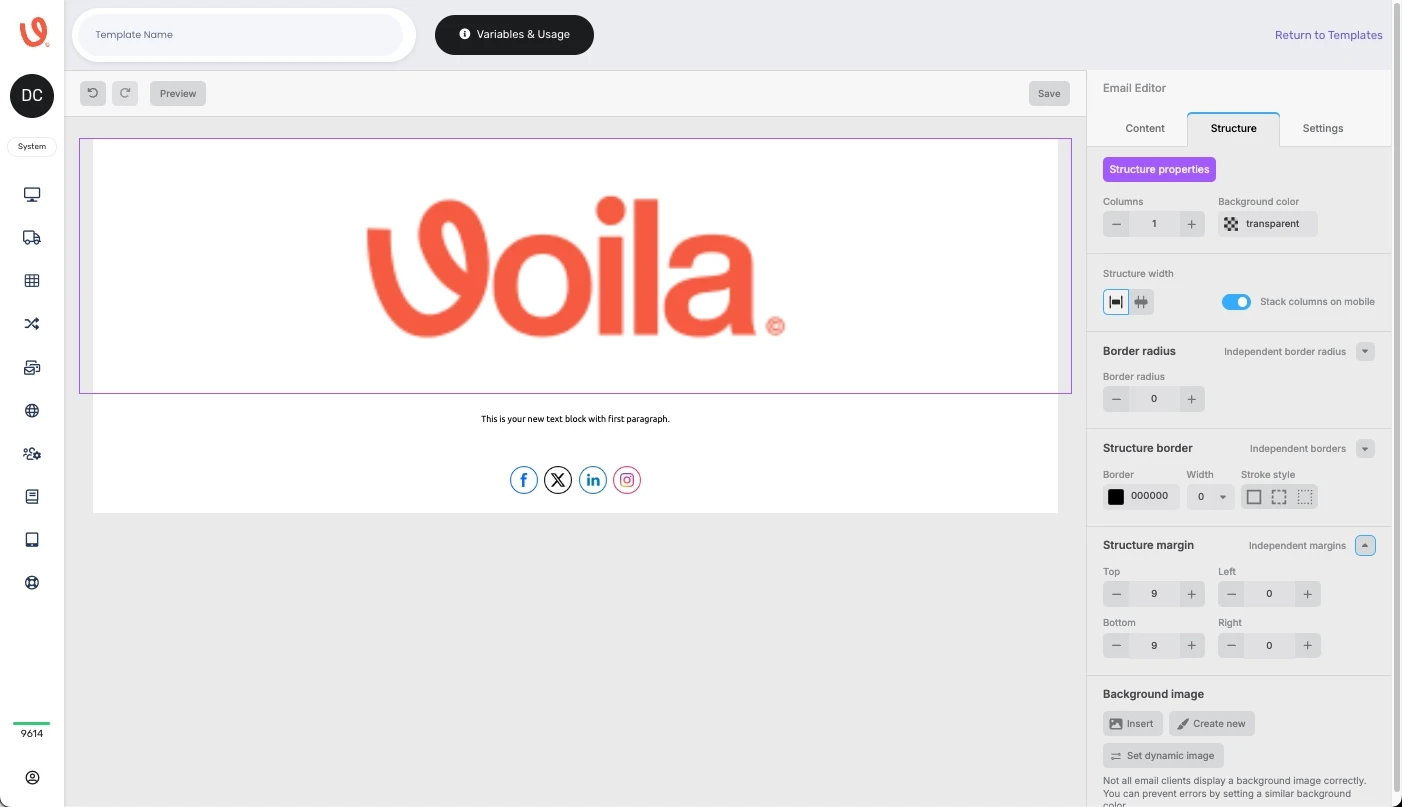](https://shipping-documentation.despatchcloud.app/uploads/images/gallery/2025-03/ck7testing.webp) # History ### **Overview** Welcome to the "Customer Notifications History" page, your central hub for tracking the status of notifications (emails) sent to customers. Here, you can view a comprehensive list of notifications, including sent, failed, cancelled, and pending messages, and take action accordingly. Explore options to check the details of past communications and cancel pending notifications. This guide will help you make the most of these features and understand the intricacies of Notification details within Voila. ### **Accessing the Notification History Page** To navigate this page, click the "Notifications" button in the left-hand menu. Once on the Notifications page, locate and click the "History" tab in the top-right corner, as indicated in the GIF below. [](https://documentation.despatchcloud.com/uploads/images/webp/Shipping/Shipping_NH_01-02.webp)**Click to Play or Pause the Video**
### **Notification Details** Here's a concise description of the critical elements on this page: - **ID**: The Notification Job ID increments with each new notification creation. - **Name**: The "Notification Name" assigned to the notification you created on the Notification page. - **Execution Time**: This represents the scheduled time for email delivery or when an email is cancelled or fails, allowing you to specify a delay after the triggered status. - **Recipient**: Displays the recipient's email address. - **Mail Account**: Indicates the selected mail account associated with the notification. - **Status**: Reflects the current status of the notification: - **Pending**: Signifies that the notification is awaiting its scheduled send time, as specified in the delay settings. - **Completed**: Indicates that the notification was successfully sent. - **Cancelled**: Denotes a notification that was cancelled before sending. - **Failed**: Marks a notification that failed to send for any reason. - **Log**: Clicking on the icon in the "Log" column allows you to access the logs associated with the specific notification, redirecting you to the "[**API Request Logs**](https://shipping-documentation.despatchcloud.app/books/api-request-records-apB/page/api-request-logs)" page. - **Preview**: Clicking the preview icon enables you to view the rendered email as the recipient will receive it. - **Cancel**: If the notification is pending, you can cancel it by clicking on the related bin icon. - **Filters**: Use the filters at the top of the page to refine your results based on specific criteria. These filters mirror the functionality of the filters found in the Notification tab. # Notifications ## **Overview** In this document, we present a powerful feature enabling you to send notifications triggered by specific events. With this functionality, you can effortlessly inform your customers about shipment milestones such as booking, dispatch, and delivery. It enhances the post-purchase experience and provides a valuable avenue for gathering user feedback on your business. In this guide, we will walk you through creating notifications. We'll introduce you to the options on the Notifications page and demonstrate how to manage and edit your notifications effectively. ### **Accessing the Notifications Page** Click the "Notifications" button from the left-hand menu to access it.**Click to Play or Pause the Video**
### **Creating a Notification** Click the "Create Notification" button in the page's top right corner.If you encounter an error message indicating the need to configure an email template or email account before proceeding, you must set these up before creating a notification. Refer to our "**[Email Templates](https://shipping-documentation.despatchcloud.app/books/notifications/page/email-templates)**" and "**[Email Settings](https://shipping-documentation.despatchcloud.app/books/notifications/page/email-settings)**" pages for detailed instructions on how to do this.
Upon clicking the "Create Notification" button, a window will appear where you can configure the filters and details for your notifications: - **Notification Name:** Choose a name for your notification; it can be anything you prefer. - **API Account:** Select the API account for which you wish to enable the notification feature. - **Linked Couriers:** After selecting the API account, specify the courier or couriers you want to notify customers about triggered events. - **Parameter:** By default, "Tracking Status" is selected as the parameter, but you can add another parameter by clicking the "Add Parameter" button. The additional parameter available is "Delay Time." - **Tracking Status:** Choose the tracking status or statuses that you want to trigger customer notifications for. For more information about tracking statuses, refer to our "Tracking API" document. - **Delay Time:** Specify the time delay, in days, after the triggered status for the email to be sent. For example, if you select "Delivered" as the tracking status and enter "7D" in the "Delay Time" field, the email will be sent seven days after we receive notification of delivery. This option allows you to send emails requesting reviews, for instance. Once you have filled in these fields, click "Continue" to proceed to the next page. On the next page, you'll configure additional details for your notification: - **Subject Line:** This is the subject of the emails that will be sent. Customise it to reflect the purpose of the email, such as "Please leave a review." - **Mail Account:** Choose one of the mail accounts you previously created on the "Email Settings" tab. - **Sender Name:** Enter the email sender's name as you want it to appear in the email. - **Sender Email:** Provide the sender's email address, which will be shown as the "from" address. Note that this email address should be defined in your mail provider settings. - **Email Template:** Click the pencil icon to access the Email Template tab and select one of the templates you created earlier. After filling in all the necessary fields and selecting the desired template, click "Create Notification." Congratulations! You have successfully created the notification, which will now appear in your list of notifications.**Click to Play or Pause the Video**
### **Notification Options** Let's explore the various options available for your created notifications: - **Status:** You can set the notification as "Active" or "Inactive" by clicking the button adjacent to it. - **Play Button:** To ensure your notification has been configured correctly, click on the test button associated with that notification. It allows you to test the notification, and the system will provide feedback on whether the test was successful or unsuccessful. - **Edit:** To change a notification, click the pencil icon in the edit column to access the editing options. - **Delete:** To remove a notification, click the trash bin icon. [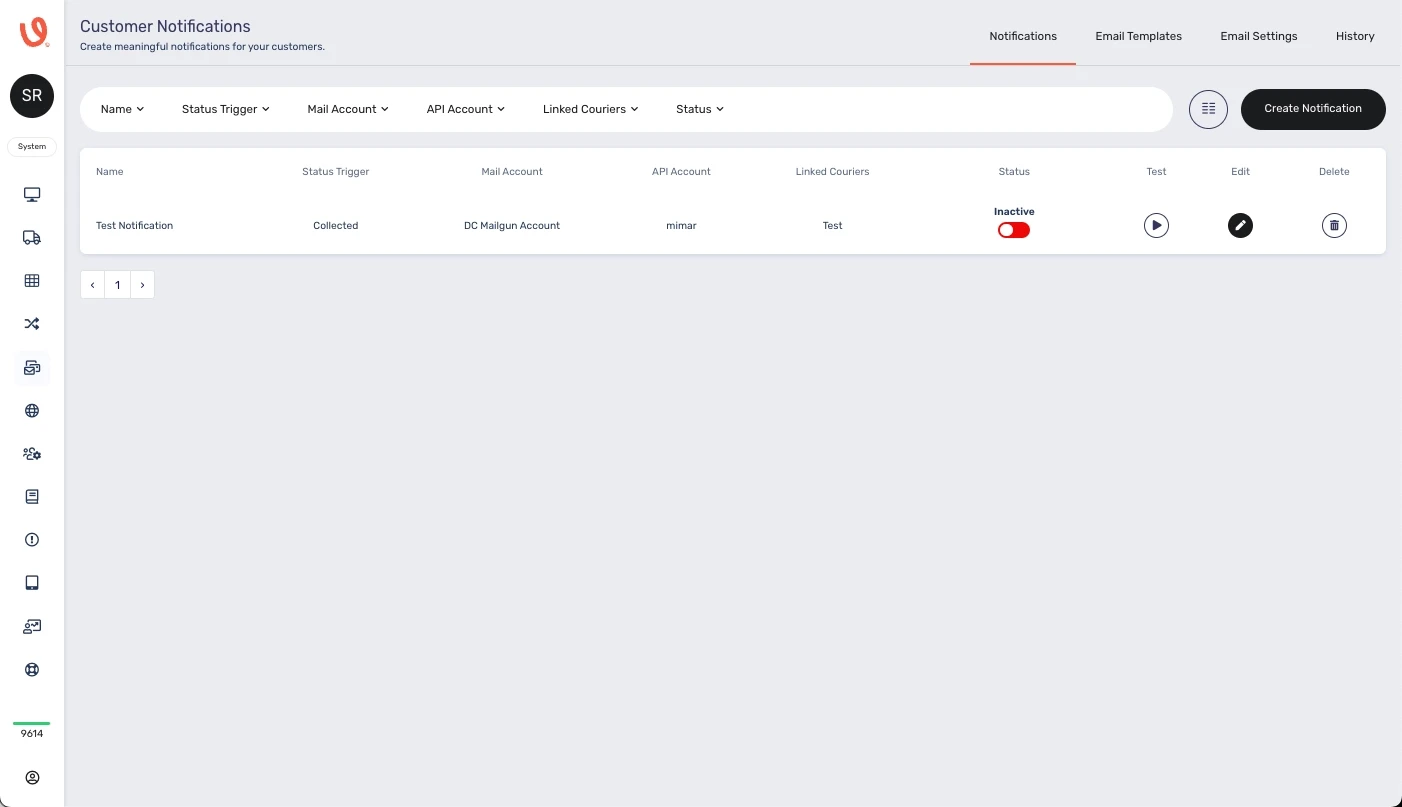](https://shipping-documentation.despatchcloud.app/uploads/images/gallery/2025-03/7lGtestnotification.webp)**Click to Play or Pause the Video**
### **Filters** Filters are crucial in refining your search results based on your specific requirements. Here's an overview of the available filter options: - **Name:** If you're looking for a notification with a particular name or a part of it, you can input the name in this field to narrow down your search results. - **Status Trigger:** This filter allows you to view notifications with specific trigger statuses, such as "Booked," "Collected," "Delivered," and more. Select the desired status(es) to filter the results accordingly. - **Mail Account:** If you've added multiple mail accounts and need to focus on specific ones, use this filter to isolate the desired mail account(s). - **API Account:** To view notifications associated with particular API accounts, make your selection from this filter. - **Linked Couriers:** This filter allows you to specify the courier(s) for which you want to view related notifications. - **Status:** If you want to differentiate between "Active" and "Inactive" notifications, you can use this filter to display notifications based on their status. Additionally, you can choose which columns are visible to you by accessing the "Column Selector." Similarly, you can customise which filters are displayed in the "Filter Selector" section, represented by the highlighted circle icon between the filter columns and the "Create Notification" button.**Click to Play or Pause the Video**