**Note:** Ensuring the same key is used in both Peoplevox and **Voila** is crucial for establishing a successful connection.
### **Setting Up the Courier Integration in Peoplevox:** To integrate a new courier service via API, follow these steps: 1. **Navigate to Integrations:** In your Peoplevox dashboard, **click** on "Integrations." 2. **Access Carrier Integrations: Select** "Carrier Integrations" from the available options. 3. **Add a New Integration:** **Click** "Add New" to begin the setup process. 4. **Name Your Integration:** **Enter** a descriptive name for the courier integration. 5. **Set the Timeout:** **Enter** "30 000" for the timeout value. 6. **Enter the API Key:** **Enter** the secure key you generated earlier. 7. **Enter the Endpoint:** **Enter** this endpoint URL which is static and remains consistent: ``` https://production.courierapi.co.uk/api/couriers/v1/third-parties/peoplevox/create-label ``` 8. **Specify the Version Schema:** **Set** the version schema to "2.0." 9. **Configure Document Types:** - **Document Type 1: Carrier Label** - Name: **Enter** `documentReference` - Reference: **Enter** `Carrier Label` - Print Template: **Select** the customer's preferred shipping label template. - **Document Type 2: Customs Documentation** - Name: **Enter** `documentReference` - Reference: **Enter** `Customs documentation` - Print Template: **Select** the customer's customs documentation template. - **Document Type 3: Packing Slip Domestic** - Name: **Enter** `Packing Slip Domestic` - Reference: **Enter** `Packing Slip Domestic` - Print Template: Please **select** the appropriate template [](https://shipping-documentation.despatchcloud.app/uploads/images/gallery/2025-02/carier-integration-peoplevox-voila2.webp)Click the image to enlarge
### **Setting up linking to Voila** Provide Voila with the generated random Pairing Key you generated earlier or create a new one if you are starting here: [Randomkeygen.com](https://randomkeygen.com/) **In the [Playground](https://playground.heyvoila.io/) or in [Postman](https://shipping-documentation.despatchcloud.app/link/176#bkmrk-%F0%9F%9A%80-quick-start-guide%3A), send a POST Request to this endpoint:** [https://production.courierapi.co.uk/api/couriers/v1/third-parties/peoplevox/link-auth](https://production.courierapi.co.uk/) ``` headers: {'api-user': 'YOUR API USER', 'api-token': 'YOUR API USER TOKEN'}, ``` **This is the JSON to POST** - change the authorisation header to the key we generated earlier, and change the address to the address you're shipping from: ```json { "peoplevox_authorization_header" : "RandomGeneratedKey", "ship_from": { "name": "Fake Company", "phone": "01377 334140", "email": "customer.support@fake.com", "company_name": "Fake Company", "address_1": "Unit 99, Warfield Road", "address_2": "", "address_3": "", "city": "Fakefurt", "postcode": "YO250FK", "county": "East Yorkshire", "country_iso": "GB", "company_id": "03764419", "tax_id": "284256444", "eori_id": "GB284256444000", "ioss_number": null } } ```Populate the information above with live customer details
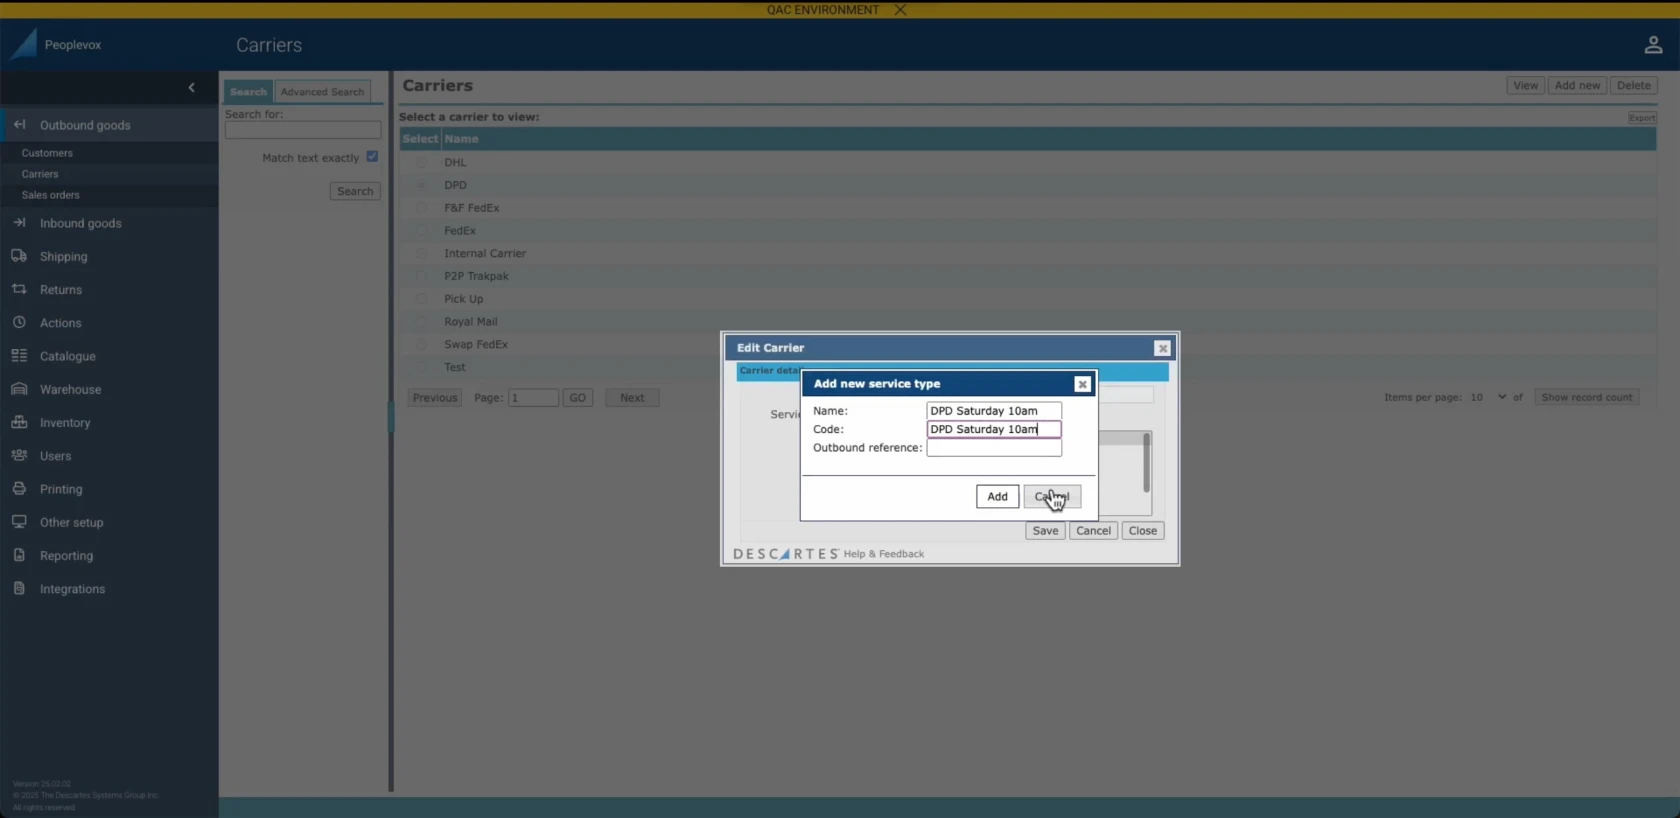
### **Set up a Smart Shipping group in [****](https://playground.heyvoila.io/)** Find detailed instructions for setting up **[Smart Shipping in Voila by following this link](https://shipping-documentation.despatchcloud.app/books/smart-shipping/page/smart-shipping)** #### **Setting up a Service Type in Peoplevox that Corresponds to a [Smart Shipping Group in ](https://playground.heyvoila.io/) ** 1. **Navigate to** 'Outbound Goods' and then **click** 'Carriers.' 2. **Select** 'Add New' for a new carrier or 'Edit' an existing carrier. 3. In the 'Name' field, **enter** the desired service type (e.g., 'DPD Saturday 10 am', 'Ebay', 'Etsy' or 'First Class'). 4. In the 'Code' field, **enter** the **exact same** name as the Smart Shipping Group (e.g., 'DPD Saturday 10 am'). This ensures proper matching. 5. **Click** 'Add' or 'Save.'**Important, verify that the 'Code' matches the Smart Shipping Group name precisely.**
[](https://shipping-documentation.despatchcloud.app/uploads/images/gallery/2025-02/setting-up-a-service-type-voila-peoplevox-a.webp)Click the image to enlarge