Knowledge Base
This directory contains documents that will help you set up features within Voila.
- FedEx Electronic Trade Documents Upload
- Shipment Tracking Dashboard on Voila
- Integrating Your Voila Account on Mintsoft
- Print More on 6x4: API Quick Guide
- Requesting Low-Volume Royal Mail Tracking
- The Windsor Framework
- Integrating your Voila Account on Peoplevox
FedEx Electronic Trade Documents Upload
Overview
Simplify your international shipping by electronically submitting customs documents after creating your shipping label. With FedEx Electronic Trade Documents, you can streamline customs processing and avoid manual paperwork.
Key Benefits
✅ Avoid Customs Delays – Submit customs documents early for broker review, preventing delays and rejections.
✅ Ensure Timely Delivery – Get packages delivered on time with a smoother customs process.
✅ Flexible Submission – Upload documents before, during, or after shipment to match your workflow.
✅ Focus on Packing – Let your shipping team concentrate on preparing shipments while customs documents are processed digitally.
How It Works
📤 Submit Customs Documents via API
Endpoint: api/couriers/v1/Fedex/add-customs-documents
{
    "testing": false,
    "auth_company": "company",
    "carrier_code": "FDXE",
    "form_code": "",
    "tracking_number": "794606723637",
    "shipment_date": "2024-02-22T12:05:45+00:00",
    "origin_country_code": "US",
    "destination_country_code": "IN",
    "origin_location_code" : "",
    "destination_location_code" : "",
    "documents": [
        {
            "ship_document_type": "COMMERCIAL_INVOICE",
            "filename" : "text.txt",
            "content_type" : "text/plain",
            "base_64_document": "Base64_text"
        }
    ]
}
Required Fields:
ship_document_type: Choose from:- CERTIFICATE_OF_ORIGIN
- COMMERCIAL_INVOICE
- DANGEROUS_GOODS_SHIPPERS_DECLARATION
- OP_900
- PRO_FORMA_INVOICE
- RETURN_INSTRUCTIONS
Notes: origin_location_code, destination_location_code, and form_code are optional.
For detailed information about this endpoint, refer to the FedEx API Documentation.
Response
Once submitted, the response includes:
- Document Type.
- Document ID & Folder ID.
- Customer Transaction ID.
- File Name.
- Success Status.
[
    {
        "output": {
            "meta": {
                "documentType": "CI",
                "docId": "EGfWYE9BxLBZ7Dzn",
                "folderId": "Ac7JnEwPoUm1I3M2"
            }
        },
        "customerTransactionId": "",
        "file": "text.txt",
        "success": true
    },
    {
        "output": {
            "meta": {
                "documentType": "CI",
                "docId": "BQH8o1FI73ZnQOg6",
                "folderId": "Ac7JnEwPoUm1I3M2"
            }
        },
        "customerTransactionId": "",
        "file": "text.txt",
        "success": true
    }
]
📚 For detailed API specifications, visit the FedEx API Documentation.
🚀 Start automating your customs clearance today!
Shipment Tracking Dashboard on Voila
Overview
Integrating your operational systems with a shipping API service can provide you with easy access to real-time shipment tracking information. Voila can help you retrieve this information effortlessly. With a dedicated function, Voila lets you monitor shipments from their despatch initiation to their final delivery destination. This documentation explains how to configure and deploy this tracking feature successfully in your system.
Shipment Tracking Dashboard on 
The visual representation below provides an insightful display of shipment details, predominantly encompassing today's shipments by default. To inspect shipments from alternative dates, the date picker positioned on the upper right-hand side of the screen proves to be a valuable tool. This feature offers a dual function: the ability to manually select dates from the calendar and the convenience of employing rapid date picker options, each offering predefined time spans such as "Today," "Yesterday," "This Week," "Last Week," and others.
Upon date filtering, a comprehensive presentation of tracking results materialises. These results encapsulate various aspects ranging from the quantity of despatched shipments to the corresponding statuses. These statuses encompass categories such as "Delivered on Time," "Late Delivery," "Exception," and "Failed."
The "Shipments Per Hour" graphical chart is noteworthy among the displayed information. It portrays shipment distribution across the selected time interval. Each shipment status is distinguishably colour-coded. Additionally, the dashboard houses two supplementary charts below: "Delivery Performance by Region" and "Active Deliveries by Tracking Status."
Chart Insights: Dive into the "Shipments Per Hour" chart to identify peak shipping times. Adjust your operations to manage high-demand periods more effectively.
An effective filtering bar is nestled on the left side of the date filter. This feature empowers users to precisely narrow down the displayed shipments based on personalised criteria. Notable options within this filtering bar encompass:
- Couriers: Facilitates the selection of specific couriers for tracking purposes.
- Friendly Service Name: Enables searches for shipments linked to specific courier presets via the Friendly Service Name filter. Service IDs or preset names can be input here. For example, the "IPX-DPDND" Service ID or the corresponding name "DPD Parcel Next Day" can be utilised. Reference to the "How to Add a Courier Service" document can provide further insights into courier services and presets.
- API Account: This option allows the selection of API accounts for tracking, which is particularly useful when multiple accounts are in use.
- To Country: Offers the ability to focus on shipments destined for particular countries.
- Tracking: This feature permits the tracking of shipments with specific statuses, including "Booked," "Collected," and "Delivered."
- On-Time/Late: This feature facilitates tracking shipments with defined time-based statuses such as "Expected Late," "Expected On Time," "Delivered Late," or "Delivered On Time."
These filtering options allow users to tailor their tracking experience to align with their specific requirements.
Click to Play or Pause the video
Integrating Your Voila Account on Mintsoft
Overview
This document provides step-by-step instructions for integrating your shipping account with Mintsoft.
Configuring a Courier Integration on
Follow these steps after logging into your Mintsoft account:
-
Expand the "Connect" Menu:
- From the left side menu, expand the "Connect" entry.
-
Select "Courier Integrations":
- From the expanded "Connect" menu, select the "Courier Integrations" option.
-
Locate "HubEurope":
- In this example, we will use "HubEurope". Click "Custom" to find it. Once officially released, it will be under the "Partners" tab. For other couriers, select the desired option from these tabs and lists.
-
Select "HubEurope":
- Choose "HubEurope" from the list of couriers.
-
Add Account:
- Click "Add Account" in the top right corner of the page.
-
Fill in Account Details:
- Password: Enter your "API Token".
- AccountNo: Enter your "API User".
- For more information on obtaining these details, visit our API Accounts page.
- Once the details are entered, click the "Add" button on the right side of the page.
-
Sync Services:
- After creating an account and redirecting to the previous page, click the yellow "Sync Services" button. This action pulls a predefined list of presets into Mintsoft. Ensure that you provide the list of required presets to Despatch Cloud. Only the Despatch Cloud team can populate the presets list, and future additions must be requested via a support ticket. They will create the appropriate presets on the API Account with matching IDs and company authentication for the courier client.

Selecting a Courier Integration
To select and use the newly installed courier, follow these steps:
-
Expand "Shipping Management":
- From the left side menu, expand the "Voila Management" option.
-
Choose "Courier Service Selection":
- Click the "Courier Service Selection" option from the listed entries.
-
Select Your Courier:
- Locate the "Courier Service" dropdown and select the appropriate courier you wish to use.

Print More on 6x4: API Quick Guide
Overview
This document outlines how to enhance the printing of information on 6x4 thermal paper using API customisation. This is achieved by adjusting keys such as "label_size" and "generate_packing_slip" to include order details, item specifics, and quantities on a single packing slip.
Efficient 6x4 Printing on
To enable the printing of additional information on a 6x4 paper size using the API, adjust the following keys in the API request:
- "shipment": { "label_size": "8x4", "generate_packing_slip": true }
Once these keys are configured as specified, the output can still be printed on a 6x4 paper. This customisation appends the order reference number ID and the individual items within the package to the bottom of the paper. The printed details include the SKU, Item Description, and quantity (qyt) for each item.
It's important to note that this method can accommodate up to three items within a single shipping slip; however, if an attempt is made to include more than three items, an additional 6x4 paper will be utilised.
To observe the real-time functionality of this customisation, you can experiment with it in our API playground. Navigate to the API Playground and follow the steps outlined below to gain insights on effectively implementing this feature:
- In the API request's shipment section, ensure "label_size" is set to 6x4 and "generate_packing_slip" is set to false.
- Click "Send Request" then "View Label" to generate and view the shipping slip.
- Observe the shipping label without the packing slip at the bottom.
- Return to the API playground and modify "label_size" to "8x4" and "generate_packing_slip" to true.
- Click "Send Request" again, followed by "View Label."
- Witness the inclusion of a packing slip at the bottom on the same 6x4 roll used for shipping labels.
You can apply the same keys in your API requests for similar outcomes, compatible with any courier.
Click to Play or Pause the Video
Requesting Low-Volume Royal Mail Tracking
Overview
If you ship between 25,000 and 300,000 items annually and wish to utilise Royal Mail's parcel tracking application, follow these steps to request Low Volume Royal Mail Tracking:
- Contact Your Account Manager
- Initiate the process by contacting your designated account manager. Inform them of your interest in low-volume Royal Mail Tracking. Your account manager will facilitate the connection with Royal Mail API support.
- Connect with Royal Mail API Support
- Your account manager will put you in contact with Royal Mail API support. This team will guide you through the steps to enable low-volume royal mail tracking for your shipments.
- Register for an App
- Following instructions from Royal Mail API support, register for an application on the Royal Mail Developer Portal at https://developer.royalmail.net/. This registration is crucial for obtaining the required credentials for tracking.
- Create an Application
- Once registered, create a new application on the Royal Mail Developer Portal. This process will generate a unique client key and secret for your application.
- Obtain Client Key and Client Secret
- After creating the application, note the provided client key and secret. These credentials will be used during the authentication process for both Royal Mail and Click and Drop APIs.
- Configure Authentication
- Enter the client key and client secret in the authentication section of your Royal Mail or Click and Drop API settings. This configuration is essential to enable tracking functionality for your shipments.
Limitations of Low-Volume Tracking: Remember that Low-Volume Royal Mail Tracking has limitations. It allows only two daily tracking events spaced 12 hours apart. Be mindful of this restriction when planning and managing your tracking activities.
Following these step-by-step instructions, you'll successfully request and set up low-volume Royal Mail Tracking for your shipping operations. Contact Royal Mail API support for further assistance if you encounter any challenges.
The Windsor Framework
Overview
The Windsor Framework is a bilateral agreement between the United Kingdom (UK) and the European Union (EU) that governs the trade relationship between Great Britain (GB) and Northern Ireland (NI) following Brexit. This framework replaces the Northern Ireland Protocol and is designed to simplify customs procedures while ensuring that Northern Ireland retains access to the EU Single Market.
This document outlines the implications of the Windsor Framework on your shipping operations, the data required for creating compliant shipment labels, and the necessary steps to ensure continued compliance.
What Is the Windsor Framework?
The Windsor Framework introduces new customs and trade regulations that govern the movement of goods from Great Britain to Northern Ireland. Key aspects of the framework include:
-
Simplified Customs Procedures:
The level of customs data required depends on the trade category:
-
Business-to-Consumer (B2C),
-
Consumer-to-Consumer (C2C),
-
Business-to-Business (B2B).
-
-
Green and Red Lanes:
- Green Lane: Goods that are deemed "not at risk" of entering the EU will be subject to simplified checks and fewer customs requirements.
- Red Lane: Goods considered "at risk" of entering the EU will require a full customs declaration, including additional details to ensure compliance with EU regulations.
-
Timelines:
Initial changes were scheduled to take effect by 30 September 2024, with full compliance expected by 31 March 2025. However, timelines remain subject to UK government updates.
Please refer to the official HMRC guidance for the latest updates, UK government’s official guidance.
How the Framework Affects Your Shipping Process
When shipping from Great Britain to Northern Ireland, additional data is required in shipment label requests to ensure accurate customs declarations and correct routing. Data requirements vary between B2C/C2C and B2B shipments.
For B2C and C2C Shipments
-
Basic Consignment Data:
- Sender and recipient names, addresses, and contact details
- Parcel weight and total consignment value
- A plain English description of the shipment contents
-
Customs Formalities:
B2C shipments typically require simpler customs data when following UK Carrier Scheme guidelines, provided the goods are not at risk of entering the EU.
For B2B Shipments
B2B shipments require more detailed data so that your shipment can be classified as either “green lane” (not at risk) or “red lane” (at risk). In addition to the basic consignment data, you must provide:
-
Mandatory Fields:
- Sale Type: Specify whether the shipment is B2B or B2C
- Number of Pieces and Total Value: Comprehensive details of the goods.
- Commodity Details:
-
Commodity codes (HS codes) – 6 or 10 digits, as required.
- Descriptions, quantities, unit weights, and unit values
- Country of manufacture
-
Deferment account details (if applicable for customs charges).
-
-
UKIMS Number:
-
Either the sender’s or recipient’s UKIMS number is required.
-
If missing, the shipment defaults to B2C rules and may be considered at risk.
-
-
EORI Number:
-
The sender’s EORI number is mandatory.
-
If a recipient’s UKIMS number is provided, their EORI number must also be included.
-
-
Clearance Declaration Details:
These details differ based on the lane:- Green Lane (Not at risk): Only minimal extra data is needed when UKIMS details are included.
- Red Lane (At risk): Requires a full international dataset, similar to an H1 declaration, along with additional customs information and may be subject to EU duties.
Data Fields Required When Creating Shipping Labels
Please check the courier requirements table for the couriers that you are using to fully comply with the courier requirements for the Windsor Framework:
To ensure compliance with the Windsor Framework, the following key fields must be included in shipment label data:
Core Data Fields
-
Sale Type: Identifies whether the shipment is B2B, B2C, C2C, or C2B.
-
Commodity Details (for B2B Shipments):
-
Commodity Code (HS Code).
-
Detailed Description: quantity, unit weight, unit value, country of origin.
-
UKIMS Number: shipper and/or recipient.
-
EORI Numbers: shipper’s EORI required; recipient’s EORI required if UKIMS details are included.
-
Additional Commodity Details: as required by the carrier.
-
Our documentation will be continuously updated as new regulations emerge, including carrier-specific compliance requirements.
Courier Requirements
| Fields/Courier | RoyalMail | Whistl | RoyalMail ClickAndDrop |
Yodel |
| Supported Sales Types: | B2B / B2C | B2B / B2C | B2B / B2C | B2C |
| courier.sale_type | Required | Required | Required | N/A |
| ship_to.ukims_number | Required for B2B shipments unless ship_from.ukims number isn't entered | N/A | Required for B2B shipments unless ship_from.ukims number isn't entered | N/A |
| ship_from.ukims_number | Required for B2B shipments | N/A | Required for B2B shipments | N/A |
| ship_to.eori_number | Required for B2B if ship_to.ukims number is entered for B2B | N/A | It is required for B2B if ship_to.ukims number is entered for B2B | N/A |
| ship_from.eori_number | Required for B2B | N/A | Required for B2B | N/A |
| item.sku | Required | Required | Required | Required |
| item.quantity | Required | Required | Required | Required |
| item.description | Required | Required | Required | Required |
| item.value | Required | Required | Required | Required |
| item.currency | Required | Required | Required | Required |
| item.origin_country | Required | Required | Required | Optional |
| item.hs_code | Required | Required | Required | Optional |
| item.weight | Required | Required | Required | Optional |
| courier.export_reason | N/A | N/A | N/A | N/A |
| courier.sender_deferment_account | N/A | N/A | N/A | N/A |
| Note | Either ship_to UKIMS or ship_from.ukims number is required for B2B shipments | UKIMS and EORI numbers should be configured on Whistl interface | Either ship_to UKIMS or ship_from.ukims number is required for B2B shipments |
| Fields/Courier | Evri Corporate |
Hermes Corporate |
DPD UK | DPD Local | DPD Ireland |
| Supported Sales Types: | B2C / C2C / C2B | B2C / C2C / C2B | B2B, B2C, C2C | B2B, B2C, C2C | B2B, B2C, C2C |
| courier.sale_type | N/A | N/A | Required | Required | Required |
| ship_to.ukims_number | N/A | N/A | Required for B2B shipments unless ship_from.ukims number isn't entered | Required for B2B shipments unless ship_from.ukims number isn't entered | Required for B2B shipments unless ship_from.ukims number isn't entered |
| ship_from.ukims_number | N/A | N/A | Required for B2B shipments if not at-risk goods | Required for B2B shipments if not at-risk goods | Required for B2B shipments if not at-risk goods |
| ship_from.vat_number | N/A | N/A | Required for B2B At Risk Goods | Required for B2B At Risk Goods | Required for B2B At Risk Goods |
| ship_to.vat_number | N/A | N/A | Required for B2B At Risk Goods if ship_from.vat_number not entered | Required for B2B At Risk Goods if ship_from.vat_number not entered | Required for B2B At Risk Goods if ship_from.vat_number not entered |
| ship_to.eori_number | N/A | N/A | Required for B2B if ship_to.ukims number is entered for B2B | Required for B2B if ship_to.ukims number is entered for B2B | Required for B2B if ship_to.ukims number is entered for B2B |
| ship_from.eori_number | N/A | N/A | Required for B2B | Required for B2B | Required for B2B |
| item.sku | Required | Required | Required | Required | Required |
| item.quantity | Required | Required | Required | Required | Required |
| item.description | Required | Required | Required | Required | Required |
| item.value | Required | Required | Required | Required | Required |
| item.currency | Required | Required | Required | Required | Required |
| item.origin_country | Required | Required | Optional for B2C&C2C but Required for B2B | Optional for B2C&C2C but Required for B2B | Optional for B2C&C2C but Required for B2B |
| item.hs_code | Required | Required | Optional for B2C&C2C but Required for B2B | Optional for B2C&C2C but Required for B2B | Optional for B2C&C2C but Required for B2B |
| item.weight | Required | Required | Required | Required | Required |
| courier.at_risk | N/A | N/A | Required | Required | Required |
| courier.export_reason | N/A | N/A | N/A | TBD | |
| courier.sender_deferment_account | N/A | N/A | N/A | TBD | |
| Note | TBD |
| Fields/Courier | RoyalMailIntersoft | ProCarrier | Hermes | DHLParcelUKCloud |
| Supported Sales Types: | B2B / B2C | TBD | B2C / C2C / C2B | B2C / B2B / C2C / C2B |
| courier.sale_type | Required | TBD | N/A | Required |
| ship_to.ukims_number | Required for B2B shipments unless ship_from.ukims number isn't entered | TBD | N/A | Required for C2B. Required for B2B if ship_from.ukims is not entered |
| ship_from.ukims_number | Required for B2B shipments | TBD | N/A | Required for B2B |
| ship_to.eori_number | Required for B2B if ship_to.ukims number is entered for B2B | TBD | N/A | Required for C2B. Required if ship_to.ukims is entered |
| ship_from.eori_number | Required for B2B | TBD | N/A | Required for B2B |
| item.sku | Required | TBD | Required | Required |
| item.quantity | Required | TBD | Required | Required |
| item.description | Required | TBD | Required | Required |
| item.value | Required | TBD | Required | Required |
| item.currency | Required | TBD | Required | Required |
| item.origin_country | Required | TBD | Required | Optional |
| item.hs_code | Required | TBD | Optional | Optional |
| item.weight | Required | TBD | Required | Required |
| courier.export_reason | N/A | TBD | N/A | Required for B2B |
| courier.sender_deferment_account | N/A | TBD | N/A | Required for B2B |
| Note | Either ship_to UKIMS or ship_from.ukims number is required for B2B shipments | TBD | B2B isn't supported by Evri so there is no need for UKIMS and EORI Number |
| Fields/Courier | DHLParcelUK | SecuredMail | Fedex | DPDC2C |
| Supported Sales Types: | B2C / B2B / C2C / C2B | B2B / B2C / C2B | TBD | TBD |
| courier.sale_type | Required | Required | TBD | TBD |
| ship_to.ukims_number | Required for C2B. Required for B2B if ship_from.ukims is not entered | Required for B2B shipments unless ship_from.ukims number isn't entered or Required for C2B shipments | TBD | TBD |
| ship_from.ukims_number | Required for B2B | Required for B2B shipments | TBD | TBD |
| ship_to.eori_number | Required for C2B. Required if ship_to.ukims is entered | Not Required | TBD | TBD |
| ship_from.eori_number | Required for B2B | Not Required | TBD | TBD |
| item.sku | Required | Required | TBD | TBD |
| item.quantity | Required | Required | TBD | TBD |
| item.description | Required | Required | TBD | TBD |
| item.value | Required | Required | TBD | TBD |
| item.currency | Required | Required | TBD | TBD |
| item.origin_country | Optional | Required | TBD | TBD |
| item.hs_code | Required | Required | TBD | TBD |
| item.weight | Required | Required | TBD | TBD |
| parcel.dim_width | Not Required | Required | TBD | TBD |
| dim_height | Not Required | Required | TBD | TBD |
| dim_length | Not Required | Required | TBD | TBD |
| dim_unit | Not Required | Required | TBD | TBD |
| courier.export_reason | Required for B2B | Required | TBD | TBD |
| courier.sender_deferment_account | Required for B2B | N/A | TBD | TBD |
| Note | TBD | TBD |
| Fields/Courier | Huxloe | DGInternational | CollectPlus | PPI |
| Supported Sales Types: | TBD | TBD | TBD | TBD |
| courier.sale_type | TBD | TBD | TBD | TBD |
| ship_to.ukims_number | TBD | TBD | TBD | TBD |
| ship_from.ukims_number | TBD | TBD | TBD | TBD |
| ship_to.eori_number | TBD | TBD | TBD | TBD |
| ship_from.eori_number | TBD | TBD | TBD | TBD |
| item.sku | TBD | TBD | TBD | TBD |
| item.quantity | TBD | TBD | TBD | TBD |
| item.description | TBD | TBD | TBD | TBD |
| item.value | TBD | TBD | TBD | TBD |
| item.currency | TBD | TBD | TBD | TBD |
| item.origin_country | TBD | TBD | TBD | TBD |
| item.hs_code | TBD | TBD | TBD | TBD |
| item.weight | TBD | TBD | TBD | TBD |
| courier.export_reason | TBD | TBD | TBD | TBD |
| courier.sender_deferment_account | TBD | TBD | TBD | TBD |
| Note | TBD | TBD | TBD | TBD |
| Fields/Courier | Starlinks | UPS | ArrowXL | ParcelHub |
| Supported Sales Types: | TBD | TBD | TBD | TBD |
| courier.sale_type | TBD | TBD | TBD | TBD |
| ship_to.ukims_number | TBD | TBD | TBD | TBD |
| ship_from.ukims_number | TBD | TBD | TBD | TBD |
| ship_to.eori_number | TBD | TBD | TBD | TBD |
| ship_from.eori_number | TBD | TBD | TBD | TBD |
| item.sku | TBD | TBD | TBD | TBD |
| item.quantity | TBD | TBD | TBD | TBD |
| item.description | TBD | TBD | TBD | TBD |
| item.value | TBD | TBD | TBD | TBD |
| item.currency | TBD | TBD | TBD | TBD |
| item.origin_country | TBD | TBD | TBD | TBD |
| item.hs_code | TBD | TBD | TBD | TBD |
| item.weight | TBD | TBD | TBD | TBD |
| courier.export_reason | TBD | TBD | TBD | TBD |
| courier.sender_deferment_account | TBD | TBD | TBD | TBD |
| Note | TBD | TBD | TBD | TBD |
| Fields/Courier | DxExpress |
| Supported Sales Types: | TBD |
| courier.sale_type | TBD |
| ship_to.ukims_number | TBD |
| ship_from.ukims_number | TBD |
| ship_to.eori_number | TBD |
| ship_from.eori_number | TBD |
| item.sku | TBD |
| item.quantity | TBD |
| item.description | TBD |
| item.value | TBD |
| item.currency | TBD |
| item.origin_country | TBD |
| item.hs_code | TBD |
| item.weight | TBD |
| courier.export_reason | TBD |
| courier.sender_deferment_account | TBD |
| Note | TBD |
Integrating your Voila Account on Peoplevox
Overview
This document provides step-by-step instructions for integrating your Voila account with Peoplevox.
Courier Integration Setup from Peoplevox to
3 Phases:
This process involves integrating a courier service in Peoplevox, utilising Voila as the intermediary. It consists of three main phases:
- Peoplevox Courier Integration Setup: Configuring the courier connection within Peoplevox to point to Voila.
- Voila Configuration: Setting up the corresponding connection and processing rules within Voila.
- Key Linking: Establishing the secure communication link between Peoplevox and Voila.
Prerequisites:
- Access to a Peoplevox account.
- An API user account within Voila.
- An API token for the API user within Voila.
Integration Process Detailed Steps:
- Generate a Secure Key:
- Use a random key generator (e.g., Randomkeygen.com) to create a unique and secure key.
- Peoplevox Configuration:
- Utilise the generated key during the courier integration setup within Peoplevox.
- Voila Configuration:
- Enter the same generated key into the appropriate linking configuration section within Voila.
Note: Ensuring the same key is used in both Peoplevox and Voila is crucial for establishing a successful connection.
Setting Up the Courier Integration in Peoplevox:
To integrate a new courier service via API, follow these steps:

Click the image to enlarge
Setting up linking to Voila
Provide Voila with the generated random Pairing Key you generated earlier or create a new one if you are starting here: Randomkeygen.com
In the Playground or in Postman, send a POST Request to this endpoint: https://production.courierapi.co.uk/api/couriers/v1/third-parties/peoplevox/link-auth
headers: {'api-user': 'YOUR API USER', 'api-token': 'YOUR API USER TOKEN'},This is the JSON to POST - change the authorisation header to the key we generated earlier, and change the address to the address you're shipping from:
{
    "peoplevox_authorization_header" : "RandomGeneratedKey",
    "ship_from": {
            "name": "Fake Company",
            "phone": "01377 334140",
            "email": "customer.support@fake.com",
            "company_name": "Fake Company",
            "address_1": "Unit 99, Warfield Road",
            "address_2": "",
            "address_3": "",
            "city": "Fakefurt",
            "postcode": "YO250FK",
            "county": "East Yorkshire",
            "country_iso": "GB",
            "company_id": "03764419",
            "tax_id": "284256444",
            "eori_id": "GB284256444000",
            "ioss_number": null
        }
}
Populate the information above with live customer details
Set up a Smart Shipping group in
Find detailed instructions for setting up Smart Shipping in Voila by following this link
Setting up a Service Type in Peoplevox that Corresponds to a Smart Shipping Group in
Important, verify that the 'Code' matches the Smart Shipping Group name precisely.
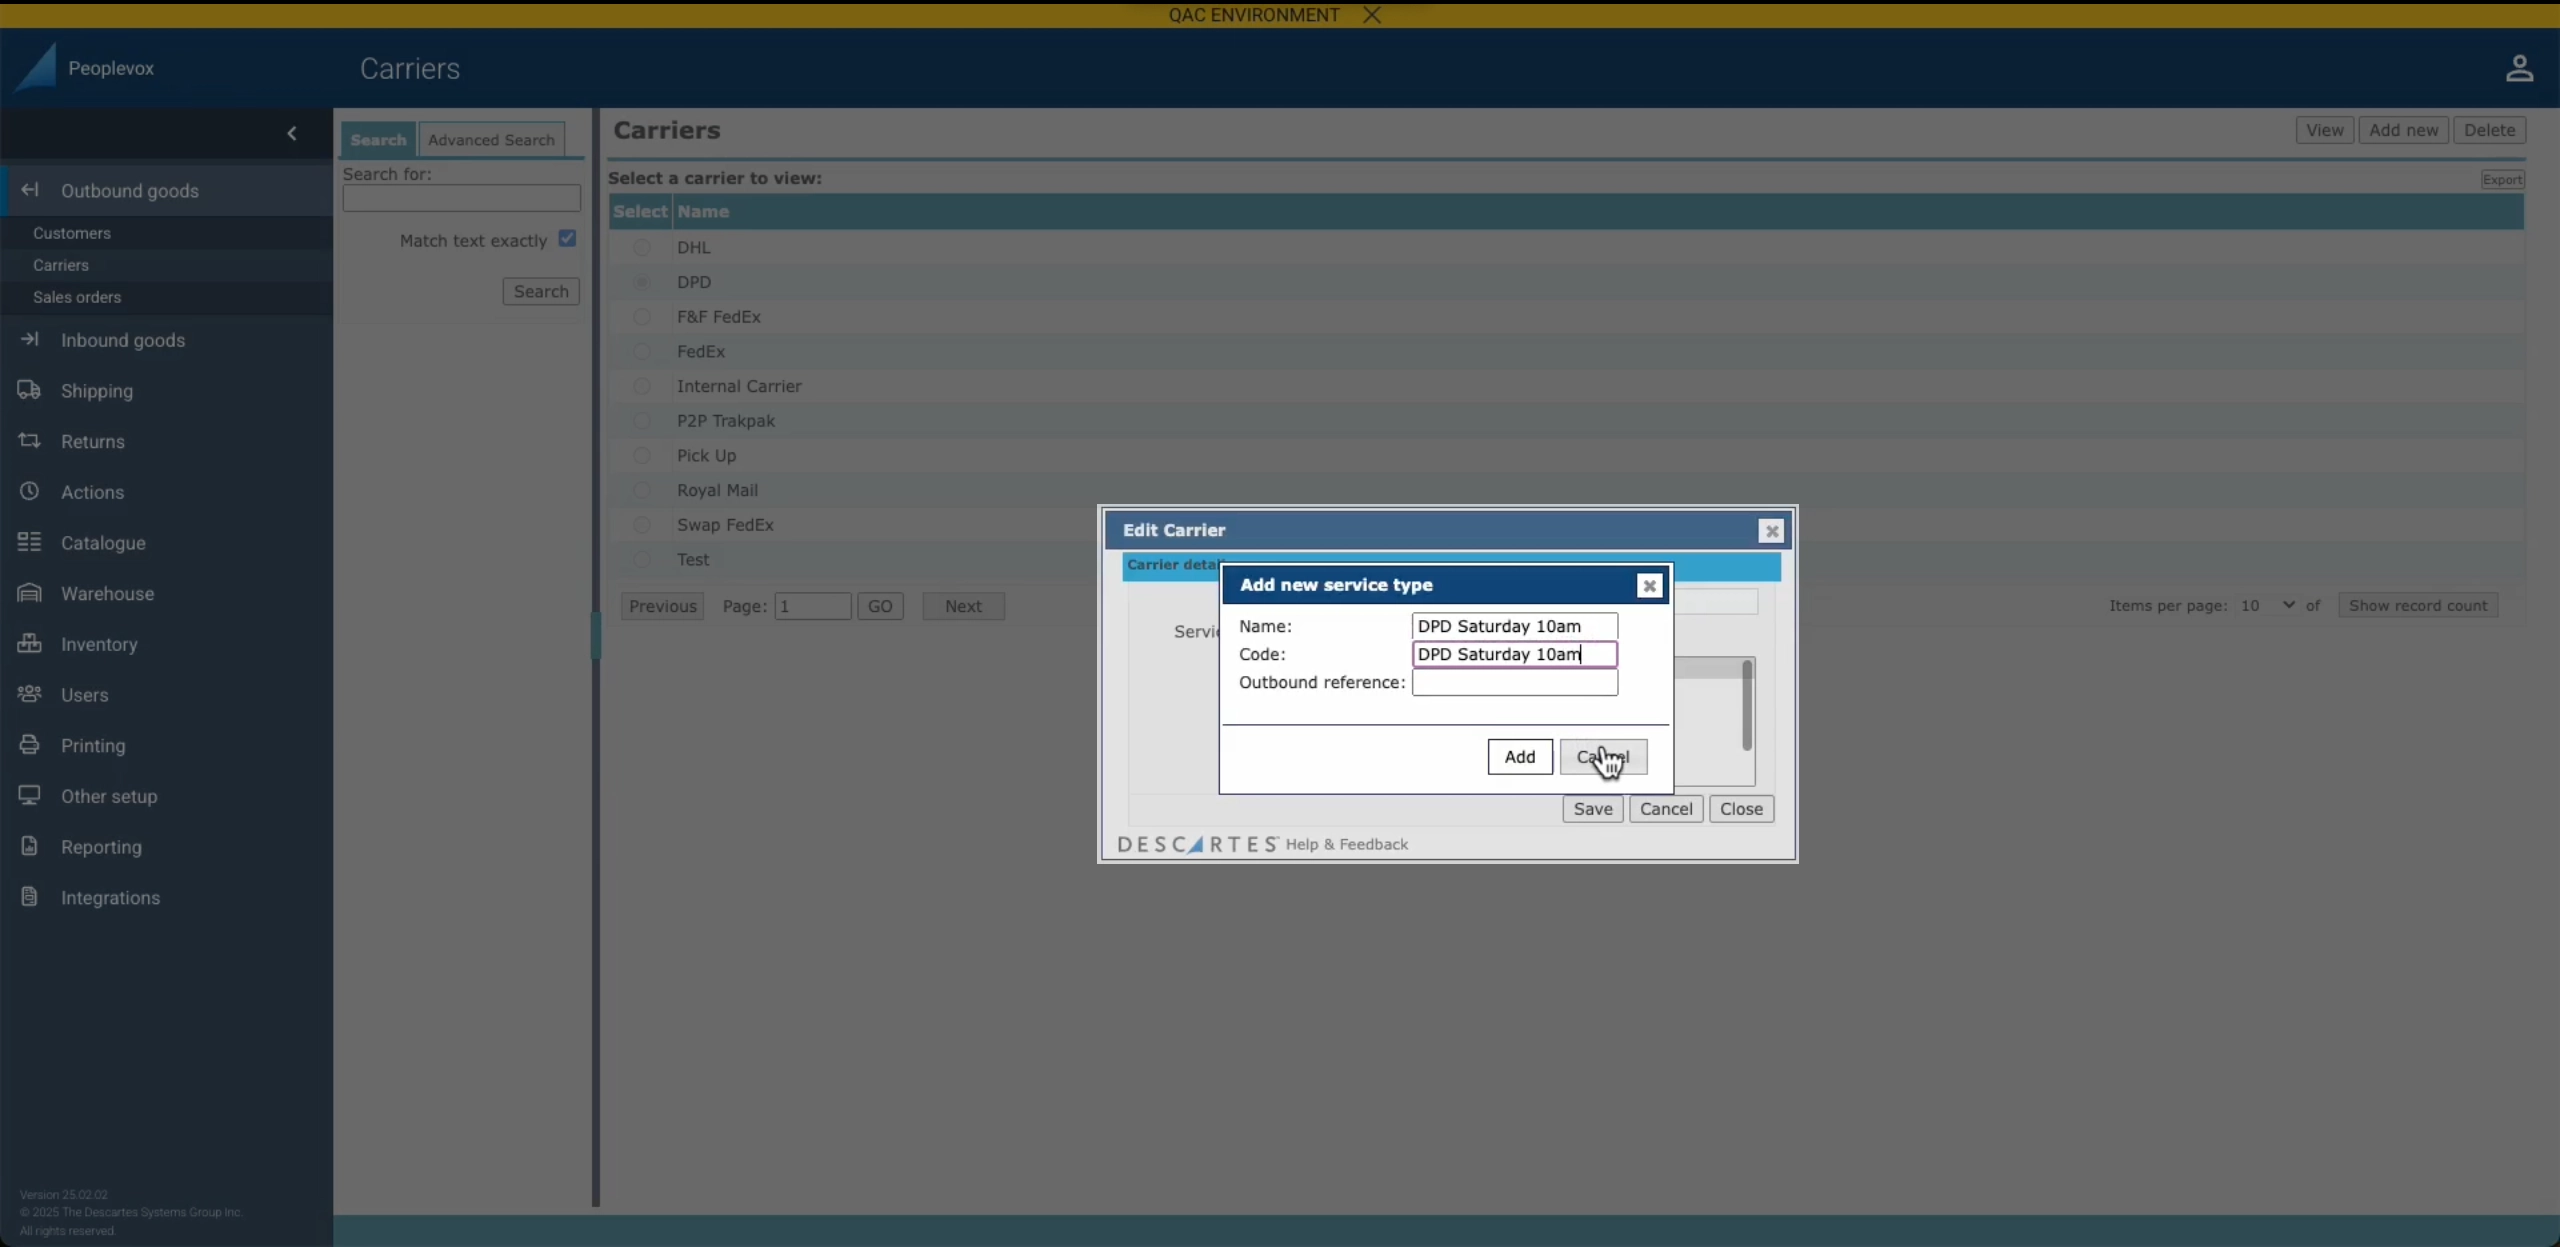
Click the image to enlarge